It’s almost Christmas, this means time to give something back. This is the first part of a new open source series I’ll be starting in which I will go step by step building open source solutions. Let’s start with a little web app that will be built on ASP.NET Core and will be deployed on Azure/LINUX!!!!. Microsoft is now Cross Platform!!! Holy Smokes. This is going to get spicy. Let’s start with some of our requirements:
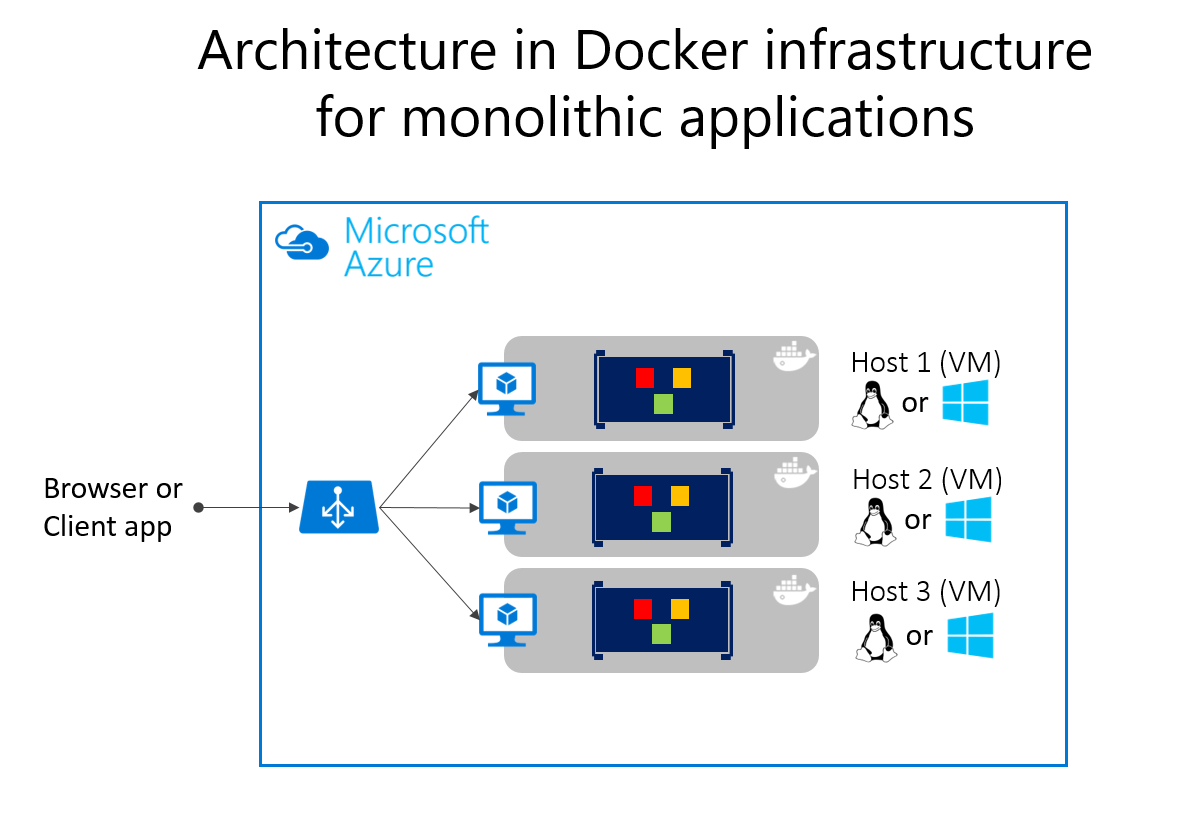
Description: Create a monolithic web app in asp.net core that shows order data, has authentication depending on role, communicates with dynamics directly via API built-in asp.net core, has its database, and exposes its data via its API, so dynamics can request order status and completion. Deploy it in Azure/Linux with all best practices regarding security. Use Azure DevOps CI/CD. Add photo-taking functionality and store it in Azure Blob Storage. Now just for fun let’s take this little app and structure it as a microservice, we will use docker, and see if we can break it.
Let’s get building!!
The application features:
1-Create, Read, Update and Delete(Shipping Orders)
-Clients(Name, Shipping address, Telephone)
-Order(Shipping Address, date(schedule for), weight, dimensions, order Id, comments, order bar code, Status, issues, , assigned to, storage path(Delivery photo is stored))
-Shipping delivery driver(Name, vehicle, vehicle id, availability, profile picture(Url to delivery driver photo))
-Warehouse(Address, Telephone)
2-Reading Orders, modifying shipping info, adding comments to the order.
3-Authentication(Role base access)
Initial models:
-Client
properties:
-Client Id
-Name
-Address
-Telephone
-Order
properties:
-Order Id
-Shipping address
-Delivery Date
-Weight
-Dimensions
-Comments
-Order Bar Code
-Status
-Issues
-Assigned To
-Storage Path
-Driver
-Driver Id
-Name
-Vehicle name
-Vehicle id
-Availability
-Profile Picture
-Warehouse
-Address
-Telephone
Steps:
- Create the models. (A model is just a C# class created inside the Models folder)
- Add classes(represent tables) to the “Models” folder, and create properties(represent fields) as required.
- Add a table identifier(Just another int property) (Entity framework core is smart enough to identify that this is the id for this table), or you can use any other name and ad a data annotator above the “id” property like [Key]
- Just note: that the component model data annotation needs to be referenced. This System.ComponentModel.DataAnnotations allow us to add more complexity to the model classes.
- Add relations between all these models.
- Adding the translator between the model classes and the database.
- We will do this using a translator file called “DbContext”. This is a translator between the models and the database. Between the model and the database, there should be a file in between, in this case between the class models and the SQL database. This file understands both C# and SQL.
- This “DbContext” is a given class in the framework but we can extend it or customize it by inheriting from it.
- We can place this file anywhere but for good practice, we will place it on the “Data” folder we just created that already contains enums. We will call it “AppDbContext”.
- To make this new class the official translator between the model classes and the SQL Database we need to inherit from the class: ( DbContext )
- Next, we need to import the Package “Microsoft.EntityFrameworkCore” from NuGet and then reference it inside this new class. Click find and install. If using .Net Core 5, The latest entity framework compatible is 5.017. Now reference the entity framework core and we have defined a new AppDbContext that will inherit from this base DbContext.
- Now we need to create a constructor. This constructor will take the following parameters
- AppDBContext(DbContextOptions<AppDbContext> options)
- Then by adding: base(options) we pass the options parameter to the base class.
- Now let’s go to startup.cs, and then to “Configure Services”, here need to specify that we want to add a new service configuration: “DbContext Configuration”, here just type: services. Add…. and you will see all the types of service configurations we can add. And as a parameter, we can pass the new class we just created out “AppDbContext”. For this, to work we need to import the namespace.
- As of now, we won’t pass any parameter but normally we would pass for example the data storage. Now we need to define which language or data store it will use.
- Adding relationships between models. (Database Schema) (Relationship Types: 1:N, N:1, or N: N ) here you can model your database schema: https://dbdiagram.io/d
- Schema Code: viewable in dbdiagram.io (DSL code) (DBML) Simple language to define database structure.
// If schema name is omitted, it will default to "public" schema.
Table client {
  client_id int [pk] // auto-increment
  name string
  address string
  phone int
}

Table order {

  order_id int [pk]
  shipping_address string
  delivery_date datetime
  weight double
  dimensions string
  comments string
  bar_code int
  status enum
  issues string
  assigned_to string
  storage_path string
  warehouse_id int
 }

Table driver {
  driver_id int [pk]
  name string
  vehicle_name string
  vehicle_id int
  availability enum
  profile_picture string
}
Table warehouse {
  warehouse_id int [pk]
  address string
  phone int
}

// Creating references
// You can also define relaionship separately
// > many-to-one; < one-to-many; - one-to-one; <> many-to-many
Ref: client.client_id < order.order_id
Ref: driver.driver_id < order.assigned_to
Ref: order.warehouse_id > warehouse.warehouse_id
Diagram:
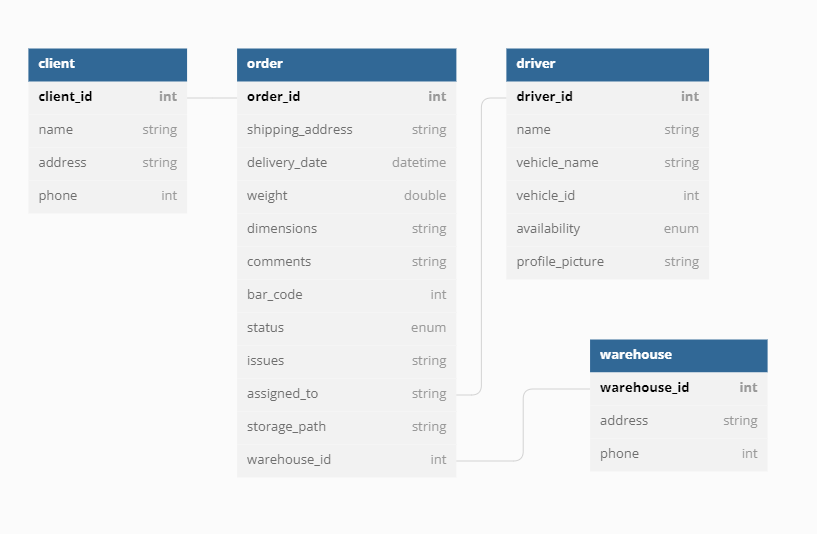
Figure 1. Very Simple Schema used for shipping module.
- Define Relationships between model classes and complete AppDBContext.
- Define all the relationships inside the model classes by creating new properties following this format:
- 1:N : or N:1 :
public int driver_id { get; set; }
[ForeignKey("driver_id")]
public Driver driver { get; set; }- Depending on the type of relationship this is how the relationships should be added.
public List<Order> order_id { get; set; }- Add in AppDbContext or the translator file the following code:
- This is just the code for 1:N and N:1, if N: N exists the OnModelCreatingMethod needs to be extended by using “protected override void onModelCreating(ModelBuilder model builder)” and then adding the other snippet.
public DbSet<Client> Clients { get; set; }
        public DbSet<Order> Orders { get; set; }
        public DbSet<Driver> Drivers { get; set; }
        public DbSet<Warehouse> Warehouses { get; set; }

protected override void OnModelCreating(ModelBuilder modelBuilder)
        {
            modelBuilder.Entity<Actor_Movie>().HasKey(am => new
            {
                am.ActorId,
                am.MovieId
            });
            modelBuilder.Entity<Actor_Movie>().HasOne(m => m.Movie).WithMany(am => am.Actors_Movies).HasForeignKey(m = > modelBuilder.MovieId);
            modelBuilder.Entity<Actor_Movie>().HasOne(m => m.Actor).WithMany(am => am.Actors_Movies).HasForeignKey(m = > modelBuilder.ActorId);

            base.OnModelCreating(modelBuilder);
}- Configure the SQL Server to be the default location to store our data
- Right-click Data Connections on the Server Explorer, then “add Connection” > connect to the database file. then add a name and create the connection.
- Go to Server explorer and right-click on Data connections > Create New SQL Server Database.
- Add a Server Name than just add a new database name.
- Then after having created the database > properties in the connection,
- copy the connection string and go to appsettings.json.
- add the following code to appjson, and create a new section:
- code to be added to appsettings.json :
- Save Changes and go to “Startup.cs” class.
- Here where we have defined which context we want to use we will define the data storage. by adding the shown code.
- We need to install a new NugetPackage: Microsoft.EntityFrameworkCore.SqlServer.
- After installing it reference it in Startup.Cs.
- Then inside we need to define the connection string. inside the UseSqlServer(”Connection String”) from the app.json.
- To get data from the appsettings.json we will use the IConfiguration interface.
- We can use it to get the connection string.
options.UseSqlServer(Configuration.GetConnectionString("DefaultConnectionString")))services.AddDbContext<AppDbContext>(options => options.UseSqlServer());"ConnectionString" : {
"DefaultConnectionString" : "--paste here your connection string--"
},- Configure Migrations:
- In Entity Framework migrations are used to sync the model changes with the database schema, based on the model classes and the DbContext File, the entity framework will generate a new c· sharp that will be used. This will be applied to the database.
- To do this Go to the “Package Manager Console”
- Before doing this we need to add a new NuGet package: Microsoft.EntityFrameworkCore.Tools
- After the installation, we go to “Package Manager Console”.
- Type Add-Migration Initial. Make sure the commands complete successfully.
- This will create a new Migrations Folder with the _name assigned to the migration.
- Add Test data to the database.
- Now that we have the migrations file created we can run the update table command in Package Manager Console: using ( Update-Database)
- Then by going to the “SQL Server Object Explorer” we can take a look at the tables created in the built-in SQL Visual Studio Visualizer.
- If we want to modify something in the database we can do it by modifying the model classes:
- Modify the AppDbContext or model classes
- run command in Package Manager Console: “Add-Migration {{Name of the migration}}”, a new migration file will be created.
- run command in Package Manager Console: “Update-DataBase”
End of Part I, next part we will add data to the SQL DataBase.